Have a Question? Look here

Common questions

Profiles and authorization

Authorization is performed using a social media profile. To authorize, click the button with the logo of the desired network. A pop-up window will appear for you to confirm permission for the tool. Once confirmed, the window will automatically close and the authorization process will be complete. The activated (dark-colored) button of the social network with a cross in the upper right corner indicates your authorization status.

If permission for the tool was previously granted, authorization will be completed instantly without any additional confirmation.

Chrome-based browsers may block the pop-up window during authentication via Twitter. In this case, you must allow pop-ups for the Popsters tool and repeat the authorization sequence by clicking on the red cross icon in the browser’s address bar.

To log out of your account in the tool, click the cross in the upper right corner of the social network button. This action will reset your authorization in the tool.

If you wish to log in as a new user but are automatically authorized as an existing user upon clicking the button, you must log out first. Then, log in to the correct social media profile before authorizing in the tool. By default, social networks prompt you to use a profile that you have previously used to access other sites and tools. This may occur if the social network uses an already linked account for third-party applications.

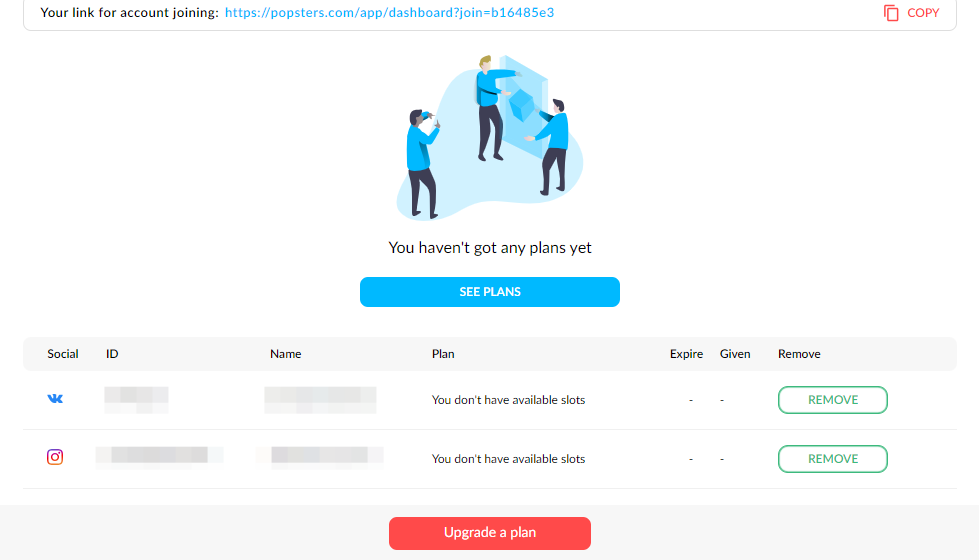
You can view information about your subscription plan and user account by opening the user panel (accessible via the button in the upper right corner).

In the user panel, you will find the profile name, current plan, validity period, number of analyses conducted, and subscription status.

Pricing

There are three paid full-scale plans and one trial plan, the latter of which has certain restrictions.

The full-scale plans differ not in functionality but in the duration for which the license is valid. The Monthly plan provides access for 30 calendar days. The Half-year plan offers access for 180 days and includes a discount, which is specified in the Pricing section. The Annual plan provides access for 365 days. The longer the duration of the plan, the higher the discount is offered.

Access to the full plans is linked to the social media profiles that you have selected. The total cost will vary depending on the number of added social media accounts. Full access for analysis is provided only for those social networks for which payment has been made.

Similarly, the trial plan is valid for each profile individually. Therefore, when authorizing and working across multiple social networks, there are specific limitations for each account. Manual activation of the trial plan is not required; it is activated automatically when you attempt your first analysis. For example, if a user authorizes both Instagram and Facebook for the first time, they will not receive full access immediately. After the first attempt to analyze something on Instagram, the trial plan for that profile is activated, while the Facebook account remains inactive. If you then attempt to load data on Facebook (or on both networks), the second account will be activated. Each account will have its own separate count towards the limited trial plan based on the network being analyzed.

Each plan includes a ‘Choose Account’ block that displays all the profiles you have activated for the tool. To purchase full access to a specific network (or multiple networks), you need to select the necessary account(s) and then proceed to payment. If the required account is not listed, you must log in to the necessary network on the main page of the tool and then return to the ‘Pricing’ section.

Full access to the tool is unlimited in terms of the number of analyses you can perform and the number of reports you can export.

With full access, you can analyze any public page on social media.

Search and Analysis

After authorization, the search bar located in the upper left corner becomes accessible. To analyze a page or hashtag, you need to locate the desired page using the tool and select it for analysis.

The search function operates in two modes: page search and post search.

By default, the search bar is set to page search mode. To find a page for analysis, simply enter the link to the page and click the ‘Search’ button. When using link search, you can add up to 10 communities at once, provided they are imported from a document or database. Importing multiple communities will work only if their addresses in the source document are split into separate lines, meaning they are separated by ‘line break’ characters.

To search by name, type the desired text into the search bar and press the ‘Search’ button. As a result, a panel with a list of communities will appear. If you are authorized in multiple social networks, the icons of those networks will appear above the search results, allowing you to switch between the search results from different platforms. For example, you can add a community from Telegram for analysis, then switch to the Facebook tab and add a few pages from there. In this case, the analysis will be conducted across several social media platforms simultaneously.

Hashtag search is available only on certain social networks, such as VK and YouTube. Additionally, for some social media platforms, searches can be conducted not only by hashtags but also by text.

To search exclusively for hashtags, you must precede the keyword with a # symbol. In other cases, the full text will be searched for the specified word.

The ‘Analyze’ button initiates the analysis of the selected pages or hashtags. By default, the analysis covers a one-month period. The calendar icon (located next to the ‘Load’ button) allows you to select a specific timeframe, ensuring that only the records from that period are analyzed.

Loaded pages

After each analysis, a block displaying the loaded communities appears to the right of the feed, showing the overall statistics for the analyzed period. This block presents totals for all main interactions: likes, shares, comment counts, published posts, views (for YouTube, VK, and Telegram), as well as the average Engagement Rate per post (ERpost) and Engagement Rate per day (ERday) for all loaded posts.

Next to each page in the block, there are three functional buttons: “Show/Hide” – which toggles the visibility of the community in the feed and graphs; “Clear” – which deletes all analyzed data for that page and clears the memory; and “Export” – which exports all loaded posts from that page to an Excel file.

With each new analysis performed, previously loaded communities are automatically hidden from the feed, and their totals are reset (as they only display data for posts currently in the feed). When you click the ‘Show’ button for the previously loaded page, all posts will reappear in the feed and graphs, along with their total metrics displayed.

Filtering

The tool can be used to filter posts in the feed by type with the ability to sort or add some other filters in the future.

When any of the filters are enabled, the total values in the “Loaded pages” block will be automatically recalculated based on the posts that remain in the feed.

Each filter operates in three modes: enabled, disabled, and excluded. By default, filters are disabled, meaning publications are not filtered. In enabled mode, only posts containing the content of interest (such as photos, links, videos, etc.) will be displayed. In excluded mode, all posts will remain except for the selected format.

Different filters can be combined with one another. For example, photos of interest can be filtered in, while text can be excluded. In this case, only posts consisting of images without accompanying text will remain in the feed.

Corporate profiles

Corporate profiles allow multiple users to access the tool simultaneously. This feature is ideal for advertising agencies and companies that need several employees to work on the same social networks at once.

Access is granted to a specific email profile, with the option to specify the number of social media accounts required for work, the duration of the subscription, and the number of users for each social media platform. After payment, the plan is assigned to the email address, and the owner can distribute paid access slots to the relevant employee profiles on the respective social media platforms.

To register an account, you must open the user panel (the button appears in the upper right corner after you log in to the tool on any social media platform) and select the ‘Corporate Profile’ section. In the “Registration” tab, you must enter your email address and password. After that, an email containing a confirmation link will be sent to you. Authorization will only be available after you have confirmed your email address.

Corporate plans are available in a special section of the ‘Pricing’ page. There is a link on the right of the main Pricing Plans section. On this page, you can select the required social networks, specify the number of months, and the number of users for each social media platform. Discounts are calculated in the same way as for personal plans, but with additional deductions: the discount increases when access is purchased for a larger number of users and social media platforms.

After obtaining access, data about the access slots acquired for each social network will appear on the corporate profile management page. The accounts attached to the corporate profile are displayed at the bottom of the window. Initially, this section is empty, and the specified social media users must be added.

To add a profile of a social media user to a corporate account, the owner (manager) of the corporate profile must to give the email address and a special secure code to the employee. The code is given in the special window in the ‘Join a corporate account’ section.

To attach a social media user profile to a corporate account, you need to copy the link (located at the top of the Corporate Account settings) and send it to the intended users. They will need to follow the link and click the “Attach” button in the window that opens for all the necessary profiles.

You can connect the corresponding slot to the associated user profile by clicking the “Give Access” button. At this stage, the user can already use the tool without restrictions from the linked profile. The owner of the corporate account has the flexibility to grant access to any profile or revoke this access and transfer it to another profile. Please note that you can transfer access from one profile to another within the same paid slot no more than once every two weeks.

If you have a user profile on a social network with paid access rights, the corporate slot will replace the active plan. Deleting the user from a corporate slot will revert the user to their previous plan. The durations of the corporate and basic plans do not combine. When reverting to the basic plan, the expiration date is set according to the most recently purchased plan.

YouTube metrics

The metrics provided in Popsters, such as Engagement Rate (ER), Views Rate (VR), Talk Rate (TR), Love Rate (LR), total and average values, and any others, excluding count of video views, likes and comments count, are proprietary metrics developed by Popsters. These metrics are calculated independently using our proprietary algorithms and are not directly derived from YouTube data. As a result, they are exclusive to the Popsters tool and are not part of the official YouTube platform.

Count of video views, likes, dislikes, comments, and video text are provided by the YouTube Data API and are presented “as is” without any modifications. These data points are directly sourced from YouTube and reflect the information available through the API. Please note that Popsters does not alter or manipulate these metrics in any way. We strive to provide accurate and unadulterated data to our users, ensuring transparency and reliability in our analytics.